MLA Format: Formatting Rules Explained
- Written by Hannah Berry (Ph.D.)
- Reviewed by Rebecca Cahill
- Published on 04/17/2021
- Updated on 01/13/2026
This guide tells you everything you need to know about the MLA formatting style for essays and articles.
It has been compiled by experts with a detailed knowledge of the MLA style, and it is based on the most up-to-date version of the MLA Handbook (9th Edition).
Please note that certain professors or institutions have their own preferences regarding formatting style, so you should always check their guidelines first. Whatever you do, the most important thing is to be consistent!
A Quick Overview of an MLA Format Paper
If this is the first time that you’ve written an academic essay, then you might be wondering: what is the MLA format? MLA stands for Modern Language Association and it is the formatting style used in Humanities courses, such as Literature and Philosophy. If you’ve been asked to use another style, such as Harvard or APA, then please see our other style guides for those pages.
The most important MLA formatting rules are as follows:
- Use a clear and readable font. Times New Roman (12pt) is recommended but not required.
- Double-space every line, including any headers, footers, and citations.
- In the top left corner of the first page, include your name, the name of your professor, the course title, and the date. Place all of these on separate lines, flush left.
- On the next line below this, centre your title. Don’t make the title bold or italicized. Capitalize the first letter of every important word.
- Use one-inch margins on all sides but keep a ½-inch gap between the top of the document and the running head. Include your surname and the page number in the running head.
- Left-justify the main body of your text and indent the first line of every new paragraph by an extra ½ an inch. Don’t leave a blank line between paragraphs.
AN ESSAY TEMPLATE
If you follow the above guidelines, you should find it easy to format your essays correctly. To help you out, here’s an MLA format example for the introduction to an essay:
 Fig. 1. Formatting for an academic research paper.
CREATING AN MLA FORMAT HEADING OR TITLE
The very start of your paper should feature a heading in the top left corner of the page. You should position this heading one inch from the top of your document. It should include the following, placed on separate, double-spaced lines:
- Start with your full name as the first line of the heading.
- On the second line, write the name of your professor or instructor. Be sure to use their appropriate title (e.g., Dr., Professor, Mr., Ms.).
- The third line should include the title of your course and its corresponding code. This information helps to identify the specific class for which the paper is being submitted.
- Finally, on the fourth line, provide the date you are submitting the paper. The date should be written in the MLA format (day month year). For example, if you are submitting the paper on July 5, 2024, the date should be written as “5 July 2024.”
On the next line beneath this (again, double-spaced), you should type the title of your essay and centralize it. Your title should not be italicized or underlined, nor should it be put in quotation marks or boldface. The first letters of every important word in the title should be capitalized, and you should not use either “ALL CAPS” or “SMALL CAPS.” Titles of books that would be capitalized or italicized in the main body of your essay should also appear so in your title. Here’s an example:
Logic and Narrative Structure in Alice’s Adventures in Wonderland
GIVE YOUR CITATIONS A BOOST TODAY
Start your TypeCite Boost 3 day free trial today. Then just $4.99 per month to save your citations, organize in projects, and much more.
SIGN UPHOW TO FORMAT MARGINS
You should use one-inch margins on all sides of your document. This uniform margin size ensures that your paper has a clean, professional appearance and provides ample space for reviewers to add comments or notes.
When setting up your document, you might find that Microsoft Word’s default settings already align with these requirements. If not, you can easily adjust the margins by following these steps:
- Ensure you have the document open where you need to adjust the margins.
- At the top of the Word window, click on the “Layout” tab. This tab contains various options for adjusting the layout and formatting of your document.
- Within the “Layout” tab, locate and click on the “Margins” button. This will open a drop-down menu with several preset margin options.
- If none of the preset options fit the one-inch margin requirement, scroll to the bottom of the drop-down menu and select “Custom Margins.” This will open a dialog box where you can manually enter the desired margin sizes.
- In the “Custom Margins” dialog box, enter “1” in the boxes for Top, Bottom, Left, and Right margins. Ensure that the running head is still set to be half an inch from the top of the page. You might need to adjust the Header settings separately by clicking on “Header & Footer” in the “Insert” tab and setting the header to be positioned 0.5 inches from the top.
WHAT IS A RUNNING HEAD?
A running head appears at the top of every page of your document. It includes your surname followed by a sequential page number. To insert the page number, select “Page Numbers” in the “Insert” menu in Microsoft Word. Don’t include “p.” or any other punctuation between your name and the page number. If your assignment requires a title page, you will not include the header in that location. Note that some professors prefer you not to include a running head on the first page of your document, in which case you should follow their advice. Your document should look like this:
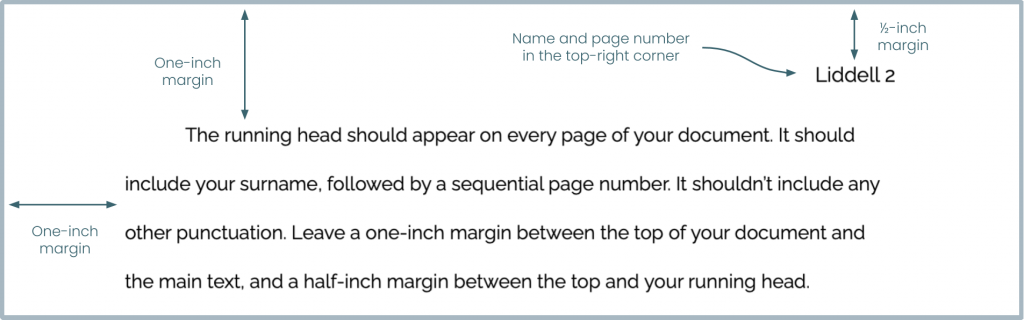 Fig. 2. The running head on page two of a research paper.
How to set up the running head in Microsoft Word
- Double-click at the top of the page to open the header area. Alternatively, you can go to the “Insert” tab and select “Header.”
- Once in the header area, type your last name followed by a space. Then, insert the page number by clicking on the “Page Number” option in the “Header & Footer” group and selecting “Top of Page” and then “Plain Number 3” to place the page number on the right.
- To ensure the running head is correctly positioned half an inch from the top, go back to the “Layout” tab, click on “Margins,” and then “Custom Margins.” In the new window, click on the “Layout” tab. Under “Header,” set the distance to 0.5 inches.
HOW SHOULD I FORMAT MY TEXT?
When it comes to formatting, the most important thing is to make it clear and readable. Use an easily recognizable font and set it to a standard size. Times New Roman (12pt) is recommended but not required. Double-space your essay all the way through, including all headers, footers, titles, quotations, notes, and Works Cited lists.
Left-justify the main body of your text. Do not fully justify it. The lines of text should not be aligned down the right-hand side of the document.
BLOCK QUOTES
If you want to include a quotation in your essay that would run to more than four lines, then you should set it off from your text as a block, indented by an extra half an inch from the left margin. Don’t include quotation marks at the start or end of the quote but do include any punctuation (such as speech marks) from the original text. If a new paragraph or speech begins within your quotation and is indented in the original text, indent it in your quotation. Don’t indent the first line of the quotation unless it is also part of a speech:
The Caterpillar and Alice looked at each other for some time in silence: at last the Caterpillar took the hookah out of its mouth, and addressed her in a languid, sleepy voice.
“Who are you?” said the Caterpillar.
This was not an encouraging opening for a conversation. (Carroll 55)
Block quotations should be introduced with a colon (:), unless your sentence flows into the first word of the quotation. At the end of the quotation, after any necessary punctuation, include an MLA format citation featuring the author’s name and page number in round brackets. Please note that this punctuation style is different from using shorter quotes in a paper.
HOW TO FORMAT A WORKS CITED LIST
It’s easy to make an MLA format Works Cited list. You can use an MLA format generator such as the one provided by TypeCite to build the individual citations. Then use the following guidelines to format your list.
First, start a new page at the end of your document, after any endnotes, and place the title, “Works Cited,” one inch from the top of the page, in the centre. There is no need to place the title in italics or bold. Second, list the works cited in alphabetical order by author surname. Left-justify them and place them one inch from the left-hand margin. If a citation extends over more than one line, indent all subsequent lines by an extra half an inch. Just like your main essay, your list of Works Cited should be double-spaced.
Structure for a printed book:
Author Surname, Author First Name and/or Initial(s). Title of Book. Edition if not the first, Publisher, Publication Date.
For example:
Carroll, Lewis. Alice’s Adventures in Wonderland and Through the Looking Glass. Vintage, 2007.
Structure for a journal article:
Author Surname, Author First Name and/or Initial(s). “Title of Article.” Title of Journal, Volume, Issue no., year, page numbers.
For example:
Bunyon, Marcus. “Teacher Preparation Programs and Longevity in Education.” American Educator, vol. 67, no. 3, 2016, pp. 6-22.
Structure for a webpage:
Author Surname, Author First Name and/or Initial(s). “Title of Page.” Name of Website, Name of Organization if included, Date, URL.
For example:
Selig, Meg. “Self-Care: All Things to All People?” Psychology Today, 13 Nov. 2023, www.psychologytoday.com /us/blog/changepower/202308/self-care-all-things-to-all-people.
Note that these examples are for the most common types of citations, including a printed book, journal article, and webpage. There are many other types of sources that you may have to cite; for more detail on these, please see our other relevant pages.
FORMATTING FOR TABLES AND ILLUSTRATIONS
You should try to keep tables and illustrations as close as possible to the place in the text where they are mentioned.
TABLES
Tables are labeled “Table,” followed by an Arabic numeral. A title is then placed on the next line and both are left-justified. All the data in the table is double-spaced, preserving the same typeface and font size as the rest of your document. The source of the data is included beneath the table. This citation will include the same elements that are used in the Works Cited. If you need to include any notes, then you should use superscript lowercase letters.
Table 1
The Longest Shakespeare Plays by Number of Words and Linesa
|
Play Title |
Number of Words |
Number of Lines |
|
Hamlet |
30,577 |
4,024 |
|
Richard III |
29,278 |
3,718 |
|
Coriolanus |
27,589 |
3,824 |
|
Cymbeline |
27,565 |
3,753 |
|
Othello |
26,450 |
3,560 |
|
Sources: “Play Lengths.” PlayShakespeare.com, www.playshakespeare.com/study/play-lengths.; Campbell, Samuel. “Length of Shakespeare Plays.” Stage Milk, 5 Jan. 2012, www.stagemilk.com/length-of-shakespeare-plays/. a. This data refers to works generally considered to have been authored solely by Shakespeare. |
||
ILLUSTRATIONS
Illustrations and any other type of visual material (such as photographs, maps, line drawings, graphs, and charts) should be labeled “Figure” (usually abbreviated as “Fig.”), followed by a Roman numeral. They are also assigned a caption or a title, followed by details of the source. All of this is placed beneath the image:
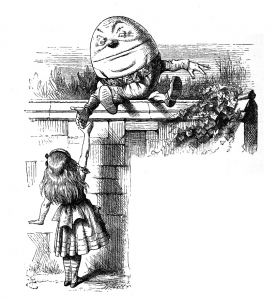
Fig. 3. Humpty Dumpty and Alice. Illustration by John Tenniel in Alice’s Adventures in Wonderland and Through the Looking Glass, by Lewis Carroll, Vintage, 2007, p. 250.
Note that all illustrations, tables, and figures should include full details about the source. Therefore, there is no need to include them in the list of Works Cited. As you’ll see from our list below, however, any works that you also cite within the main text of your essay will need to be included in your Works Cited.
WORKS CITED
Carroll, Lewis. Alice’s Adventures in Wonderland and Through the Looking Glass. Vintage, 2007.
MLA Handbook. 9th ed., Modern Language Association of America, 2021.
Hannah Berry (Ph.D.)
Hannah Berry has lectured at several colleges and teaches at the WEA. Besides publishing extensively, she has taught citation skills and written multiple style guides.